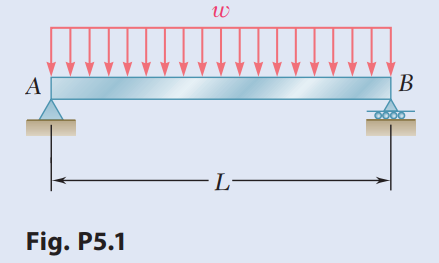
For the beam and loading shown, (a) draw the shear and bending-moment diagrams, (b) determine the equations of the shear and bending-moment curves
▯▯▯▯▯▯▯▯▯▯▯▯ ▯▯▯▯▯▯▯▯▯▯▯▯▯▯▯▯▯▯▯▯▯▯▯▯▯▯▯▯▯ ▯▯▯▯▯▯▯ ▯▯▯▯▯▯▯▯▯ ▯▯▯▯▯▯▯▯▯▯▯ ▯▯▯▯▯▯▯▯▯▯▯▯▯▯▯▯▯▯▯▯▯ ▯ ▯▯▯▯▯▯▯▯ ▯▯▯▯▯▯▯▯▯▯▯▯▯▯▯▯▯ ▯ ▯▯▯▯▯▯ ▯▯▯▯▯▯▯▯▯▯▯▯▯▯ ▯▯▯▯▯▯▯ ▯ ▯▯▯▯▯▯▯▯▯▯▯▯▯▯▯▯▯▯▯▯▯▯▯▯▯▯▯▯▯▯▯▯▯▯▯▯▯▯▯▯▯▯▯▯▯▯▯▯▯▯▯▯▯▯▯▯▯▯▯▯▯▯▯▯▯▯ ▯ ▯▯▯▯▯▯▯▯▯▯▯▯▯▯▯▯▯▯▯▯▯▯▯▯▯▯▯▯▯▯▯▯▯▯▯▯▯▯▯▯▯▯▯▯▯▯▯▯▯▯▯▯▯▯ ▯ ▯▯▯▯▯▯▯▯▯▯▯▯▯▯▯▯▯▯▯▯▯▯▯▯▯▯▯▯▯▯▯▯▯▯▯▯▯▯▯▯▯▯▯▯▯▯ ▯ ▯▯▯▯▯▯▯▯▯▯▯▯▯▯▯▯▯▯▯▯▯▯▯▯▯▯▯▯▯▯▯▯▯▯▯▯▯▯▯▯▯▯▯▯▯▯▯▯▯▯▯▯▯▯▯▯▯▯▯▯▯▯▯▯▯▯▯▯▯▯▯▯ ▯ ▯▯▯▯▯▯▯▯▯▯▯▯▯▯▯▯▯▯▯▯▯▯▯▯▯▯▯▯▯▯▯▯▯▯▯▯▯▯▯▯▯▯▯▯▯▯▯▯▯▯▯▯▯▯▯ ▯▯▯▯▯▯▯▯▯▯▯▯▯▯▯▯▯▯ ▯ ▯▯▯▯▯▯▯▯▯▯▯▯▯▯▯▯▯▯▯▯▯▯▯▯▯▯▯▯▯▯▯▯▯▯▯▯▯▯▯▯▯▯▯▯▯▯▯ ▯ ▯▯▯▯▯▯▯▯▯▯▯▯▯▯▯▯▯▯▯▯▯▯▯▯▯▯▯▯▯▯▯▯▯▯▯ ▯ ▯▯▯▯▯▯▯▯▯▯▯▯▯▯▯▯▯▯▯▯▯▯▯▯▯▯▯▯▯▯▯▯▯▯▯▯▯▯▯▯▯▯▯▯▯ ▯ ▯▯▯▯▯▯▯▯▯▯▯▯▯▯▯▯▯▯▯▯▯▯▯▯▯▯▯▯▯▯▯▯▯▯▯▯▯▯ ▯ ▯▯▯▯▯▯▯▯▯▯▯▯▯▯▯▯▯▯▯▯▯▯▯▯▯▯▯▯▯▯▯▯▯▯▯▯▯▯▯▯ ▯ ▯▯▯▯▯▯▯▯▯▯▯▯▯▯▯▯▯▯▯▯▯▯▯▯▯▯▯▯▯▯▯▯▯▯▯▯▯▯▯▯▯▯▯▯▯▯▯▯▯▯▯▯▯▯▯▯▯▯▯▯▯▯▯▯▯ ▯▯▯▯▯▯▯▯▯▯▯▯▯▯▯▯▯ ▯ ▯▯▯▯▯▯▯▯▯▯▯▯▯▯▯▯▯▯▯▯▯▯▯▯▯▯▯▯▯▯▯▯▯▯▯▯▯▯▯▯▯▯▯▯▯▯▯▯▯▯▯▯▯▯▯▯▯▯▯▯▯ ▯ ▯▯▯▯▯▯▯▯▯▯▯▯▯▯▯▯▯▯▯▯▯▯▯▯▯▯▯▯▯▯▯▯▯▯▯▯▯▯▯▯▯▯▯▯▯▯▯▯▯▯▯▯▯▯▯▯▯▯▯▯▯▯▯▯▯ ▯ ▯▯▯▯▯▯▯▯▯▯▯▯▯▯▯▯▯▯▯▯▯▯▯▯▯▯▯▯▯▯▯▯▯▯▯▯▯▯▯▯▯▯▯▯ ▯▯▯▯▯▯▯▯▯▯▯▯▯▯▯▯▯▯▯▯▯▯▯▯▯▯▯▯▯ ▯ ▯▯▯▯▯▯▯▯▯▯▯▯▯▯▯▯▯▯▯▯▯▯▯▯▯▯▯▯▯▯▯▯▯▯▯ ▯ ▯▯▯▯▯▯▯▯▯ ▯ ▯▯▯ ▯ ▯▯▯▯▯▯▯▯▯▯▯▯▯▯▯▯▯▯▯▯▯▯▯▯▯▯▯▯▯▯▯▯▯▯▯▯▯▯▯▯▯▯▯▯▯▯▯▯▯▯▯▯▯▯▯ ▯ ▯▯▯▯▯▯▯▯▯▯▯▯▯▯▯▯▯▯▯▯▯▯ ▯ ▯▯▯▯▯▯▯▯▯▯▯▯▯▯▯▯▯▯▯▯ ▯ ▯▯▯▯▯ ▯▯▯▯▯▯▯▯▯▯▯▯▯▯▯▯▯▯▯▯▯▯▯▯▯▯▯▯▯▯▯▯▯▯▯▯▯▯▯▯▯▯▯▯▯▯▯▯▯▯▯ ▯ ▯▯▯▯▯▯▯▯▯▯▯▯▯▯▯▯▯▯ ▯▯▯▯▯▯▯▯▯▯▯▯▯▯▯▯▯▯▯▯▯ ▯ ▯▯▯▯▯▯▯▯▯▯▯▯▯▯▯▯▯▯▯▯▯▯▯▯▯▯▯▯▯▯▯▯▯▯▯▯▯▯▯▯▯▯▯▯▯▯▯▯ ▯ ▯▯▯▯▯▯▯▯▯▯▯▯▯▯▯▯▯▯▯▯▯▯▯▯▯▯▯▯▯▯▯▯▯▯▯▯▯▯▯▯▯▯▯▯▯▯▯ ▯▯▯▯▯▯▯▯▯▯▯▯▯▯▯▯▯▯▯▯▯▯ ▯ ▯▯▯▯▯▯▯▯▯▯▯▯▯▯▯▯▯▯▯▯▯▯▯▯▯▯▯▯▯▯▯▯▯▯▯▯▯▯▯▯▯▯▯▯▯▯▯▯▯▯▯ ▯ ▯▯▯▯▯▯▯▯▯▯▯▯▯▯▯▯▯▯▯▯▯▯▯▯▯▯▯▯▯▯▯▯▯▯▯▯▯▯▯▯▯▯▯▯▯▯▯▯